Unit Testing with Junit 5
Overview
In this post, we delve into the core aspects of unit testing using JUnit 5.
Understanding Unit Testing
What is Unit Testing?
Unit testing involves testing individual units or components of a software independently to validate that each unit functions as intended. In Java, a unit typically refers to a method or function.
Why Unit Testing?
- Early Bug Detection: Identifying and fixing bugs during the development phase is more cost-effective than discovering them later in the process.
- Code Maintainability: Unit tests act as documentation, providing insights into the expected behavior of each unit, which aids in code maintenance.
- Refactoring Support: Unit tests ensure that existing functionalities aren’t broken when you make changes, encouraging code refactoring.
Writing Effective Unit Tests
- Test Structure:
- Follow the AAA pattern (Arrange, Act, Assert) to structure your tests clearly.
- Arrange (Given): Set up the necessary preconditions.
- Act (When): Execute the unit under test.
- Assert (Then): Verify the expected results.
- Test Coverage:
- Aim for comprehensive test coverage to ensure that all code paths are exercised.
- Use code coverage tools to identify areas that need additional testing.
- Isolation of Tests:
- Ensure that tests are independent of each other, as one test should not affect the outcome of another.
- Utilize mocking frameworks (e.g., Mockito) to isolate units and simulate external dependencies.
Running and Analyzing Tests
- Continuous Integration:
- Integrate unit tests into your continuous integration (CI) pipeline to ensure that tests are run automatically with each code change.
- Test Reports:
- Leverage the reporting capabilities of your testing framework to generate detailed reports, helping you identify failing tests and their causes.
- Test Debugging:
- Use debugging tools to analyze failing tests and identify the root cause of issues.
Best Practices for Unit Testing in Java
- Keep Tests Simple and Readable:
- Write tests that are easy to understand, making it simpler for other developers to maintain and extend them.
- Regular Maintenance:
- Update tests as the codebase evolves to ensure they remain relevant and accurate.
- Test Naming Conventions:
- Follow consistent and descriptive naming conventions for your test methods.
- Focus on Critical Paths:
- Prioritize testing of critical and frequently used paths in your application.
- Balance Test Speed and Realism:
- Aim for a balance between test execution speed and realism to create efficient yet meaningful tests.
Junit 5 Architecture
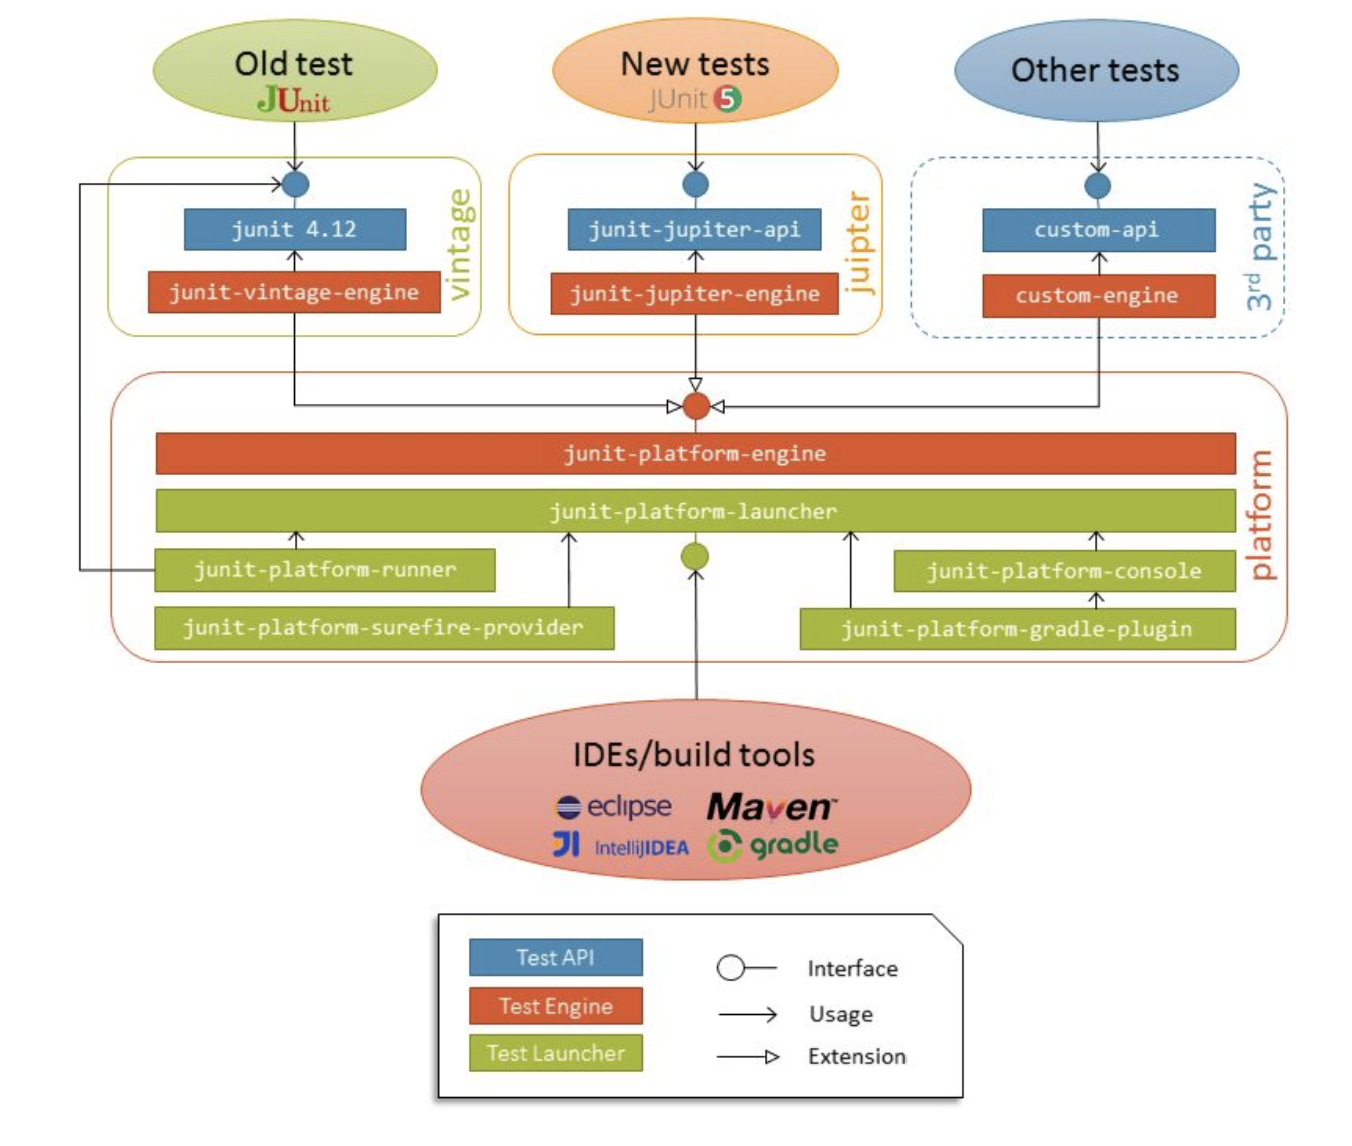
Junit 5 is designed in moduler way that separates API, Execution engine, Execution, and Integration.
Here are the three modules that make up the JUnit 5 framework:
JUnit Platform: Provides an API for tools to discover and run tests. It defines an interface between JUnit and customers who want to run the tests from IDEs, build tools, or console.
JUnit Jupiter: Provides an annotation-based API to write JUnit 5 unit tests, along with a test engine that lets you run them.
JUnit Vintage: Offers a test engine to run JUnit 3 and JUnit 4 tests, thereby ensuring backward compatibility (with earlier versions of the JUnit framework).
JUnit5 requires minimum Java-8 to be installed on the system.
The goal of this architecture is to separate the responsibilities of testing, execution, and extensions. Thus facilitating the integration of other test frameworks with the JUnit framework.
Junit 5 Common Annotations
All core annotations are located in org.junit.jupiter.api package in the junit-jupiter-api module.
| Annotation | Description |
|---|---|
| @Test | Marks method as a Test method |
| @BeforeAll | Runs method before all test methods |
| @AfterAll | Runs method after all test methods have executed |
| @BeforeEach | Runs method before each Test method |
| @AfterEach | Runs method after each Test method |
| @Nested | Indicates the class is a nested class |
Junit 5 Utility Classes
Assertions
This class provides overloaded static utility methods that are used for asserting conditions while performing unit testing.
- Assertion method parameter1: expectedValue.
- Assertion method parameter2: actualValue.
Conventions for writing test methods in JUnit 5
Method Signature:
Test methods must be annotated with @Test. They should be public, void-returning, and take no parameters.
1
2
3
4
@Test
public void myTestMethod() {
    // Test logic
}
Test Names:
Test method names should be descriptive, concise, and follow a consistent naming convention. Use camelCase or underscores to separate words.
1
2
3
4
@Test
public void calculateTotalCost() {
    // Test logic
}
Assertions:
Use JUnit’s assertion methods for validating expected outcomes. Common assertion methods include assertEquals, assertTrue, assertFalse, etc.
1
2
3
4
5
@Test
public void testAddition() {
    int result = Calculator.add(2, 3);
    assertEquals(5, result);
}
Exception Testing:
To test methods that are expected to throw exceptions, use the assertThrows method.
1
2
3
4
@Test
public void testDivisionByZero() {
    assertThrows(ArithmeticException.class, () -> Calculator.divide(5, 0));
}
Test Annotations:
JUnit 5 provides various annotations to enhance test behavior, such as @BeforeEach, @AfterEach, @BeforeAll, and @AfterAll.
@BeforeEach and @AfterEach are particularly useful for setting up and tearing down resources before and after each test method.
1
2
3
4
5
6
7
8
9
@BeforeEach
void setUp() {
    // Initialization logic before each test
}

@AfterEach
void tearDown() {
    // Cleanup logic after each test
}
Test Groups and Tags:
Use @Tag to categorize tests and run specific groups of tests. Helpful for organizing and selectively running tests based on their characteristics.
1
2
3
4
5
@Test
@Tag("integration")
void testIntegrationScenario() {
    // Integration test logic
}
Conditional Execution:
Use @Disabled to temporarily disable a test. Conditional test execution based on specific conditions can be achieved using @EnabledOnOs, @EnabledIfSystemProperty, etc.
1
2
3
4
5
@Test
@Disabled("Temporary disabled due to a bug")
void temporarilyDisabledTest() {
    // Test logic
}
Parameterized Tests:
JUnit 5 supports parameterized tests using @ParameterizedTest and various sources. Allows you to run the same test with different inputs.
1
2
3
4
5
@ParameterizedTest
@ValueSource(ints = {1, 2, 3})
void testWithParameter(int value) {
    // Test logic with parameterized input
}
Conclusion
Mastering unit testing in Java with JUnit 5 is essential for ensuring the reliability and correctness of your code. By following best practices, leveraging JUnit 5 features, and adhering to conventions, you can build robust test suites that contribute to the overall quality of your software.